|
|
|
|
|
* (A Paludarium is an artificial biotop
living,
reproducing as faithfully as the wild and untamed, __________________________________________________________________________________________________
Detail overall project milestones : __________________________________________________________________________________________________ |
|
|
Presentation of the Project
Project status
:
Completed
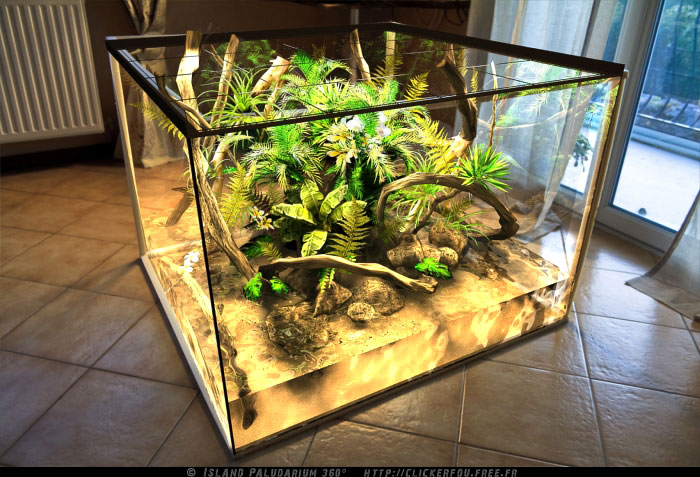
For this third project is an island 360° that I will
realize, the tank is glass 8mm thick and 100cm fully closed side, the
Seychelles natural sand will form a small island strewn with boulders,
covered vegetation, driftwood branches and vines falling from the ceiling
fill the space, and will be covered with orchids and moss (lots of
moss).
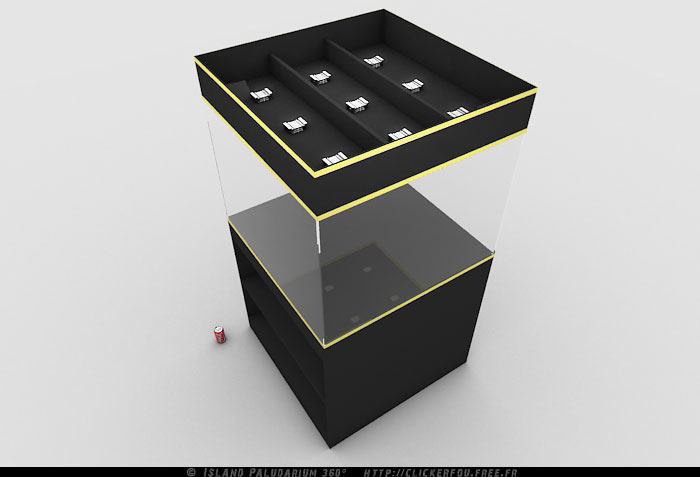
In the gallery we see the 9 LED heat sinks, and two small fans (in the corners but not visible in photo) that will provide aeration of the tank and the effect of "light breeze on vegetation".
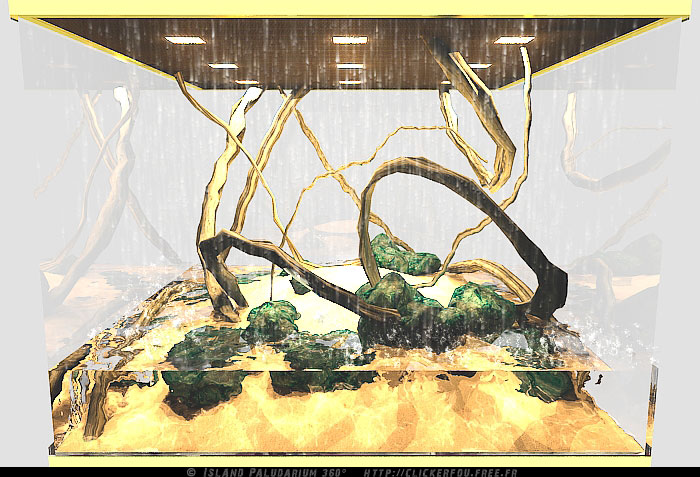
The islet, rocks, rain (which falls directly off the ceiling)
Hover over the photo above with the cursor to show / hide the rain.
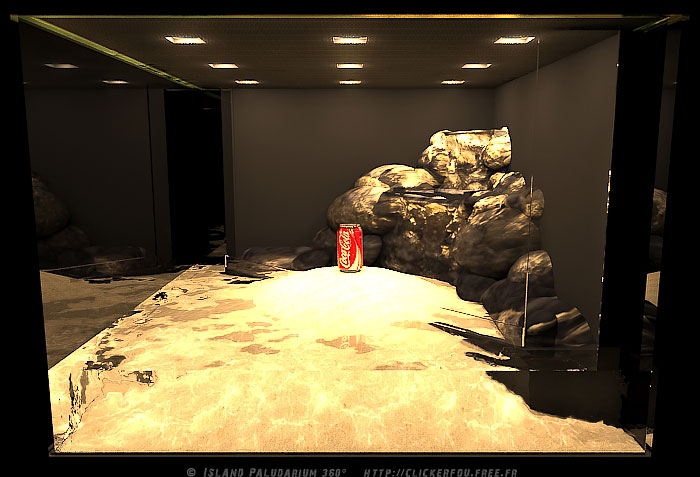
Another view without rain.
(The can serves as a marker size).
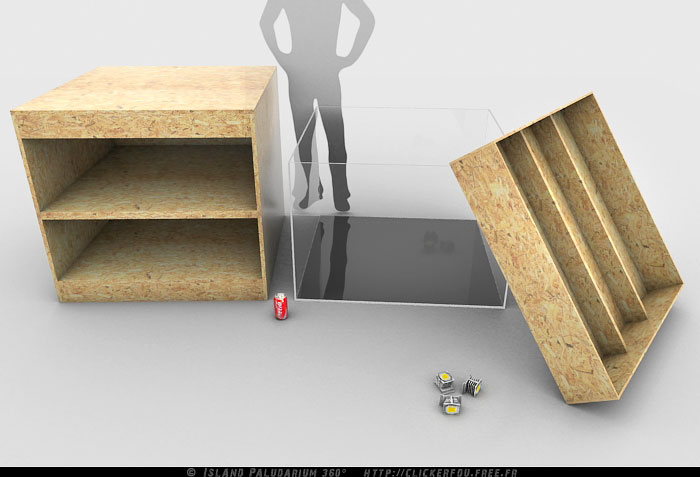
Superimposing the 3D tank at real size, in a picture to better understand the proportions.
First test of LEDs Testing 50W LED in situation in my previous project (Waterfall Paludarium).
Creation of the Gallery
Wuhu, we go for the new Adventure!
Work
began, I started assembling the gallery, here in the photo. Painting gallery in black.
__________________________________________________________________________________________________
Creation of the furniture
The furniture
is now assembled, have yet to paint it.
(The can serves as a marker size).
Painting the furniture black.
We can see the plate of extruded polystyrene installed on the furniture,
to receive the tank.
Creation of the Glass Tank
A large stage is passed, ouf !!! It
is not easy this story .... But the tank is standing !!!
Silicone freshly put
There are more than wait until everything dries quietly in a week I do the water test.
Getting water Thursday, 07. June 2012, 22:09 The seals of the tank having been much time to dry, it's time to put the water to start preparing the implementation of the various systems that generate the climate, and there to work !
No water leak was found so far.
Angles to finish the 24k gold leaf Initially I wanted to paint the aluminum angle iron bomb "golden" for the golden effect, but in view of the result of said paint (what I expected) it proves to be very disappointing.
So I decided to take one at a corner, the 24 carat gold leaf. The result
is now more than appointment. A little comparison to illustrate my point :
Creating the Climate System - The Rain Willing to make a most natural plants irrigation, I thought long to a true system of rain "natural" (without the effect of cow pee). It took me a long time, reflection, and imagination to succeed in developing this system and develop this idea.
The soundscape so characteristic of the rain is there.
Rain water that is used is totally devoid of limestone,
splashing on the glass are not dirty, and even clean them.
The mist of foggers is heavier than air, it is usually located
at the bottom.
The rain runs randomly "alternate" with other systems that
generate climate.
The technical part of the system and its operation remain secret, I will not expose anything more about the rain. There are more than a dozen ways (more or less effective) to realize, I just imagined a rain that is adapted to the constraints and possibilities of this project.
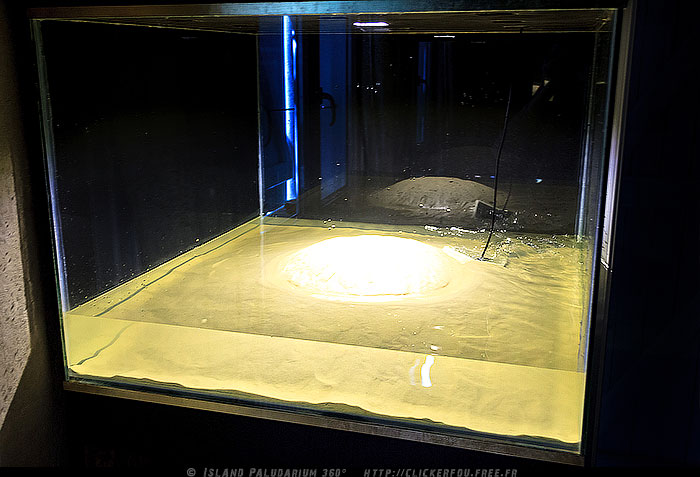
I nstalling the Sandy BeachWednesday, 01. August 2012, 15:00
Shaping a natural sand island of the Seychelles.
Creation of the Gallery LED lighting Sunday, 26. August 2012, 17:40
These are the LEDs that this time still have retained my attention (high-power).
The spots are not all set yet, but it does not prevent me to take some
pictures.
For this series of photos, I temporarily placed a potted plant and a
branch of driftwood, to better assess the effectiveness of light on
objects.
The lights went reflected in the glass, amplifying the impression of a larger volume.
The spots are placed so that the light never reaches the
eye directly
Background Black... and White Here now a year since I was not busy I of the project, I had left it as is with the potted plant and root driftwood. It functioned since without lighting (there was no need), just the water filtration. However the sun fact gradually grow algae on the sand. I was not very happy at first to see the sandy dirty, so I put a Snail "Neritina Coromandeliana" and two small shrimp "White Pearl" which henceforth maintain the windows and sand. (It certainly will take more shrimp for algae, but it will come). Over time I got used to see the sand like that, and I decided not to clean with its irregularities, it has become even more natural. This aspect is not to displease me altogether! I resumed work by changing the black background
already installed, I wanted to switch sometimes black, sometimes white ... Cruel
dilemma, so I finally make a slide on each side of the bottom to accommodate a
plate of white foam board and black on each side. So I just have to pull the
plate and simply return it to completely change its appearance.
It almost seems the terrascaping seen like that ... But it will not remain
empty for a long time ;)
The water level dropped by half in one year through evaporation.
I put a piece of foam on the driftwood, it has gradually spread.
The central LED was grilled and through tests, I will have to change.
The snail Neritina Coromandeliana and White Pearl Shrimp cleaning the floor.
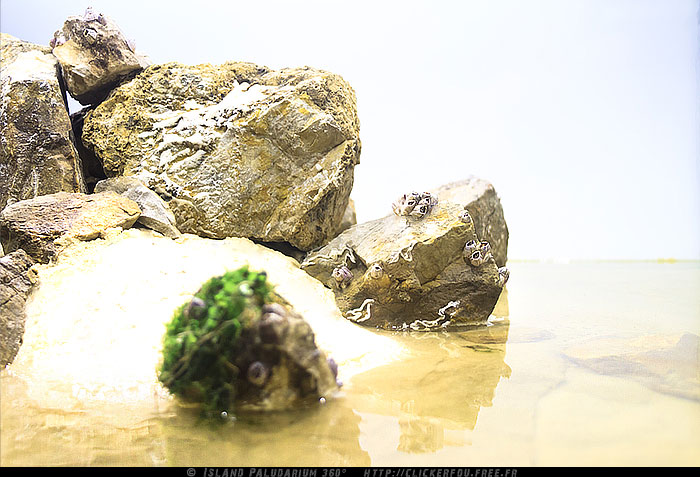
Rocky Scenery, Shell & Marine Pests
After various attempts at sculpture rocks in expanded
polyurethane foam, realism does not always suited me ... Out of curiosity,
I tried with real rocks, and I was immediately hooked.
As for the rocks, the details and realism of the true
barnacles could not be more perfect.
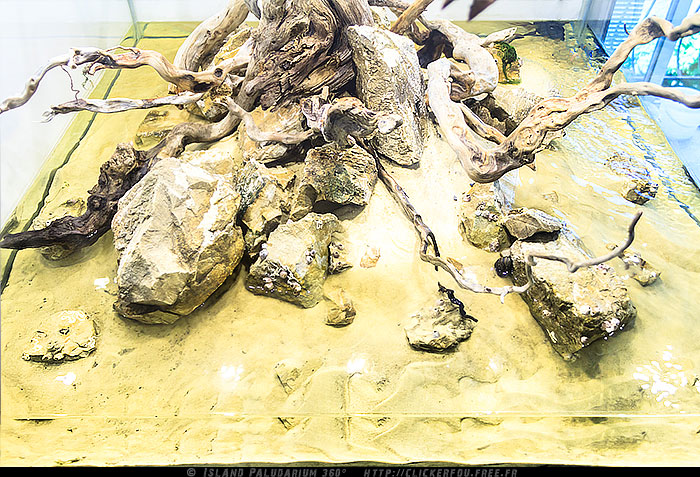
Installation of Driftwood
The finest roots will be braided and used later finishing
for natural air creepers.
This appears for the moment
a little "dry" and "lifeless", but keep in mind that the branches will be
vegetated and sometimes completely covered with moss.
Also I chose to use only the natural elements to make the structure of the
set.
Note that the provision may yet evolve over the steps.
Pump waves (in the bottom right corner) will be hidden later.
Creating the decor : Natural Aerial Lianas The lianas were also planned
artificial initially but I gradually opted for an all-natural decoration,
as much it completely go. So I selected the finer branches of driftwood,
to to intermingle and let it hang of the decor.
A little staging, lianas come to life, and the wild side
appears.
Also, in order to conceal the electrical and son pipes unsightly pumps
that will cross the stage, and especially instead of of hiding them, I
planned to diverted their presence by braiding the same way as lianas for
a fully integrated concealment in the background.
__________________________________________________________________________________________________
Climate System - The Mist I planned the waterfall in the center of the island, but
the current layout of branches and rocks will not allow me to achieve this
configuration.
Electrical wire are painted in tone branches. It must also
interleaved real vines and moss to improve their camouflage.
The
mist generated by these foggers is heavy, it is located at the water's
edge when operate alone.
As soon as the rain will soon be reactivated, the mist will "scope" by the
high humidity generated by the rain. The mist will then slowly and
uniformly spread throughout the volume of the air saturating humidity.
Climate System - Waves Friday, 30. August 2013, 11:21 To avoid constant static effect on the surface, pumps waves (or pump vibration) brew 150 liters of water and gives it life.
The waves are also randomly assigned to alternate with other climatic
phases.
The second beneficial effect of the water current is the
dispersion of sand dunes forming underwater. What makes the beach more
natural.
__________________________________________________________________________________________________ Total overhaul of the System of Rain and Gallery Tuesday, 10. September 2013, 14:12 The rain system that I crafted in July of last year, it did not prove fully effective and deserved to be completely redone. I hoped that this first test would conclude but that was not the case. I even amended again several times without major improvements. But this is no big deal, because I made the decision based on my results I got with the first prototype, entirely redo it and thought better. I had already thought about improvements in the first implemented, so I was able apply. It was worth it because the rain was not perfect, dripping too has some places and not at all to others ... The more so she could not run unattended, because of the drops accumulated on the rails and falling by ground within a few minutes. I remind that rain is not simply "aesthetic or decorative", but especially in order to meet the real needs of plants that will be installed underneath.
The problems experienced with the previous prototype are
now all resolved. The rain is now perfect on the entire surface of the
project except for one detail...
The Disadvantage of rain (because nothing is ever perfect) are collaterals
splashing on the windows ...
The moisture percentage rises well when the rain is on.
Note that the rain is almost invisible on white background.
The water cycle is fully closed circuit, the water of
paludarium that is reused for rain, no external supply of water is added. The rain is not continuous function, like other systems, it alternates randomly varying and rebalance of humidity, temperature, etc ...
And finally, the video.
__________________________________________________________________________________________________
Installing the Vegetation These are the mosses which in this project will serve as a substrate for plants, replacing the artificial technique geotextile felt, usually used for some years in this discipline (this technique just took over the principle of nature to retain moisture). The mosses resume the role they play in nature ie, provide root support for plants and maintenance of their water needs. A completely natural and living substrate, it works so well for millions of years it did not need changing. Plants benefit from the rain as in the wild. Looking more closely, nature is really well done because when they fall on the leaves, the drops are automatically channeled to the major branches dripping stems, all leading directly to the roots. The substrate thus receives water directly provided by plants, it is moistened and kept moist at least until the next automatic start of the rain. As the water used is free of limestone, the leaves do not suffer from the rain.
The plants were mainly found online about Ben's Jungle,
Karnivores and Le Jardin du Pic Vert.
__________________________________________________________________________________________________ Detailed listing of the Vegetation Thursday, 19. September 2013, 11:04 The current vegetation consists of 25 different varieties of plants including : Ferns :
Dryopteris atrata
European Fern(unnamed).
Blechnum spicant
Polypodium vulgare
Asplenium trichomanes
Mosses :
Java moss, seeded on aerial branches.
Lebermoos, located on the rocks at the water's edge.
Sagina subulata
and several other varieties of foams European type that serve as a
substrate with Sphagnum Chile.
Creeping & climbing:
Helxine
Ficus pumila (repens)
Pyrrosia serpens
Different Orchids:
Haraella Ordorata
Angreacum didieri
Masdevallia Constricta x heathii
Ceratosylus
retisquama syn. rubra
Psygmorchis Pusilla (it took a hit to warm before installation, I hope she will recover).
Pleurothallis Spec. Mittelamerika
Oncidium variegatum
And a mini-Phalaenopsis.
(Not yet in bloom at the moment)
The "palm" type Chamaedorea elegans
And finally, a Bromelia :
Vriesea splendens
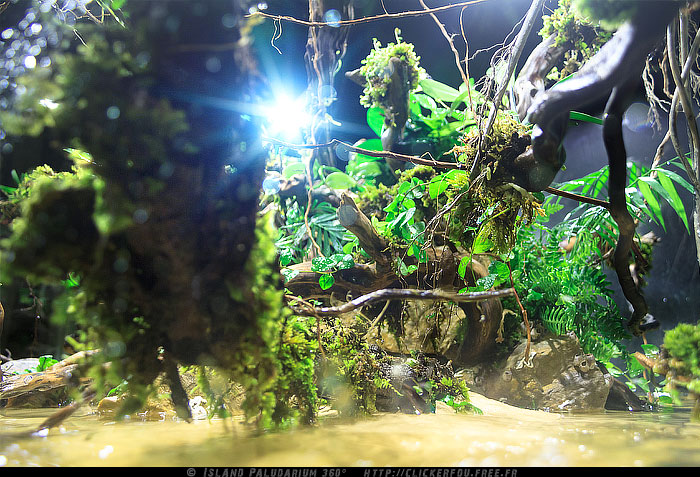
Mist in the Morning Wednesday, 20. September 2013, 11:01 This morning I could see before the start light, a ray of the rising sun, plunging through the vegetation and the morning mist.
When the freshness of the night made up more moisture, you can see a misty morning scenery if foggers are running at that time. Phenomenon disappears when the light is gradually raise the temperature and slightly lower moisture (if the rain has not intervened).
The Trap Pump
The hatch is made to conceal the pump. More importantly,
letting the water but not the sand, the entire range acts as a natural
filtration ... The pump draws the inside which is then re-sent on plants
and decor via the system perfectly clean rain water. Made of polystyrene, holed four sides and insulated with felt, the pump draws filtered by sand island water without risk of suck up sand.
The hatch in place covered with sand on the edge to hide the ends.
It was then vegetalized like traditional branches with the mosses to blend perfectly with the rest of the decor. Besides, you had probably not noticed on previous pictures ...
This "branch" has become the support of the small fern
"Polypodium vulgare."
Evolution of Vegetation - 2nd Month Wednesday, 20. November 2013, 10:59
Two months have passed since the installation of the plants. It was good
to do a little state of play.
Climatic conditions inside work perfectly, and the
lighting (LED High Power) also participates in large part to the success
of this proliferation.
Climbing plants (Ficus, and Vanilla) rises pierce the light.
The Lebermoos begins to well invading the rocky edge of the island.
The proliferation of micro-algae in the water by the passage of the sun in this season will change once more the uniformity of sand. But this is not a bad thing the contrary is that more natural. (However, the water remained perfectly clear, even if a slight green tint the color now).
Java moss to extend here and there inexorably.
Elected achieving project of the year "Paludariums Forum" Wednesday, 22. January 2014, 13:02 There are nearly 7 years, I made the discovery of a discipline, "paludariums" the only French forum on the topic "paludariums, a world between Heaven and Water." Forum essential in this area and especially since the beginning administered by a passionate "Phill". There are a little over 8 years now. This forum bloomed in my mind a whole bunch of ideas taking their roots in the plant, water and mineral world. And here goes that there by little this realization "Island Paludarium 360" has been assigned the achievement of the 2013 Forum.
Here is "Palunette" the magnificent trophy that creates
fully Bupa (a member of this forum).
Also thank you to everyone who followed me during this project. Thank you
all. ;)
__________________________________________________________________________________________________
Evolution of Vegetation - 6 months (this
winter)
Six months have passed since the installation of
vegetation, a small summary of winter images is required.
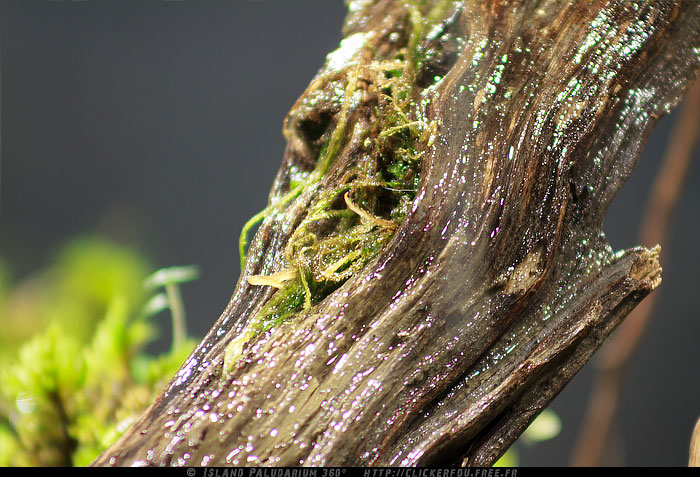
We can see that the branches of driftwood begin to ward off humus on their surface. This is the result of the renewal foam, which gives more nutrients to new mosses and plants that grow there.
The bottom of the water is obviously messed with the time, but it has the
advantage of accentuating the natural effect.
Evolution of Vegetation - 1 Year Wednesday, September 17, 2014, 1:59 p.m.
A year that the project is running alone, I did not
intervene it, I chose to "let do".
We can see the algae accumulated at the bottom of the water, creating a
thick carpet.
Cutting of vegetation (currently) Sunday 19 October 2014, 3:54 p.m.
Here is the project now, after a big cleaning of the water
area and the hobbing plants "invaders."
However, I left a part dirt in here and there on the sand to keep this
little wild effect.
|